Income Forms
Students > Income Forms
Income Forms is where income forms are matched to students.
Income Forms Screen

-
Search Text - search by reference code, signed by name, or student name
-
Received Date - filter by date received
-
Academic Year - filter by academic year
-
Reset - click to reset search
-
Reference Code - click to sort by reference code
-
Student(s) - notice student names
-
Eligibility Status - click to sort by equivalent eligibility status
-
Eligibility Reason (not pictured) - categorical eligibility reason, if any; note: other source categorically eligible is not displayed
-
Received Date - click to sort by the date received
-
Signed By - click to sort by signature name
-
Matched - notice the true/false status of whether all students on the income form are matched in the database
-
Pencil - click to be redirected to the individual income form screen
-
< > - click to scroll through pages
Individual Income Form

-
Notice the Reference Code, Household Size, Eligibility, Phone, Email, Annual Income Range, Assistance Program (if enabled), and Child Income (if enabled).
(not pictured, only if enabled) Notice the Name and Total Wages of each household member. -
Name - notice student names
Note: The white bar shows the data entered on the income form. If a match for the student is found in TITAN, an additional green bar will show the student's information from the student database. -
Date of Birth - notice dates of birth
-
School - notice enrolled schools
-
Grade - notice grade levels
-
Trash Can (matched students only) - click to remove an existing match, then proceed to Step 7
-
Magnifying Glass (unmatched students only) - click to search for a match manually in the district's student database
-
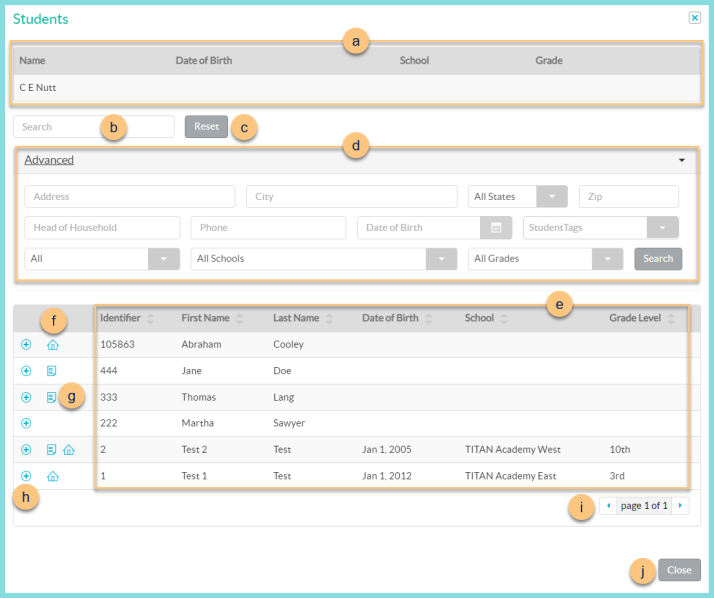
Notice the Name, Date of Birth, School, and Grade as entered on the income form.
-
Search - search for existing students by name or identifier
-
Reset - click to reset search parameters
-
Click Advanced to open additional filters including Address, Head of Household, Phone, Date of Birth, Student Tags, All (enrollment status), Schools, and Grades. Click Search to apply advanced filters.
-
Notice the Identifier, First Name, Last Name, Date of Birth, School, and Grade Level of students in the database. Click the header to sort by that field.
-
House Icon, Truck Icon (not pictured) - hover to see the home address or mailing address respectively
-
Paper Icon - hover to see current meal application information. An orange icon indicates that the application is expiring soon. Note: This icon is only visible if the student has an application on file
-
(+) - click to select the student as a match
-
< > - click to scroll through pages
-
Close - click to return to the previous screen without selecting a match
-
Notice the Signed By name and Date Signed.
-
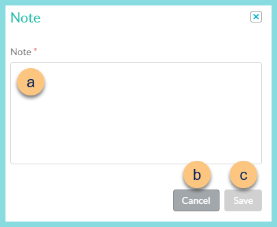
Notice any existing Notes. Click (+) New Note to add a new note.
-
Note - enter note text. Note: Notes are not editable once saved.
-
Cancel - click to return to the previous screen without saving changes
-
Save - click to save changes
-
Close - click to return to the previous screen.
Note: Income Forms are not "processed." Updates are saved as entered, so there is no need to save.